CPP Pitfall in Action
全局变量初始化机制
C++ 标准规定:
- 同一编译单元(
.cpp文件)内,全局变量按声明顺序初始化 - 不同编译单元之间的初始化顺序未定义(
unspecified)
注意:静态局部变量在首次访问时初始化(线程安全,C++11 后)
链接器处理静态库的机制
当链接器处理静态库时:
- 静态库是
.o文件的集合(archive) - 链接器只链接被引用的符号,如果符号未被引用,对应的
.o文件不会被链接 - 链接顺序影响哪些符号被引用
内存重复释放问题
重复删除是指对同一个指针调用 delete 两次或多次。在 C++ 中,这是未定义行为(Undefined Behavior),会导致严重的问题。
注意:C++ 标准明确规定:
delete nullptr是安全的空操作,不会产生任何副作用。
int* p = nullptr;
delete p;  // ✅ 完全安全,什么都不做
delete p;  // ✅ 再次删除也是安全的
重复删除会导致什么问题?
问题1: 程序崩溃(最常见)
原因:内存管理器(如 glibc malloc/free)会维护一个数据结构来跟踪已分配和已释放的内存块。重复删除会破坏这个数据结构。
表现:
*** Error in `./program': double free or corruption (fasttop): 0x0000000001234567 ***
Aborted (core dumped)
示例:
#include <iostream>

int main() {
    int* p = new int(1);
    delete p;   // 第一次删除 ✅
    delete p;   // 第二次删除 ❌ - 程序崩溃!
    return 0;
}
运行结果:
double free or corruption (fasttop): 0x00007f8b8c000010
Aborted (core dumped)
问题2: 堆损坏(Heap Corruption)
原因:现代内存管理器(如 glibc ptmalloc)会在内存块前后放置元数据(metadata)。重复删除可能导致:
- 元数据被破坏
- 内存管理器的内部链表结构被破坏
- 其他内存块被意外修改
表现:
- 程序可能不会立即崩溃
- 在后续的内存操作中崩溃(可能在完全不同的地方)
- 数据被意外修改
- 非常难以调试(崩溃位置与问题位置不一致)
示例:
int* p1 = new int(100);
int* p2 = new int(200);
delete p1;
delete p1;  // 重复删除 p1,可能破坏 p2 的内存
// 此时 p2 指向的内存可能已经被破坏
std::cout << *p2;  // 可能输出错误的值,或崩溃
问题3: 安全漏洞
原因:堆损坏可能导致:
- 内存覆盖(Memory Overwrite)
- 控制流劫持(如果函数指针被覆盖)
- 信息泄露
问题4: 未定义行为(Undefined Behavior)
根据 C++ 标准,重复删除是未定义行为,这意味着:
- 程序可能崩溃
- 程序可能正常运行(但数据错误)
- 程序可能在任何时候以任何方式失败
- 不同编译器、不同平台的表现可能完全不同
- 调试版本和发布版本的表现可能不同
实际测试示例
// test_double_delete.cpp
//
// 编译: g++ -o test_double_delete test_double_delete.cpp
// 运行: ./test_double_delete

#include <iostream>

class CTracingInfo
{
public:
    int data;
    CTracingInfo() : data(1)
    {
        std::cout << "CTracingInfo created at " << this << std::endl;
    }
    ~CTracingInfo()
    {
        std::cout << "CTracingInfo destroyed at " << this << std::endl;
    }
};

// CTransportContext(允许拷贝的版本,用于演示问题)
class CTransportContext
{
public:
    CTracingInfo* m_pTracingInfo;

    CTransportContext() : m_pTracingInfo(nullptr) {}

    // 注意:没有定义拷贝构造函数,使用编译器生成的浅拷贝
    // 这是问题的根源!

    ~CTransportContext()
    {
        std::cout << "CTransportContext destructor called, deleting m_pTracingInfo = " << static_cast<void*>(m_pTracingInfo) << std::endl;
        delete m_pTracingInfo;  // 如果多个对象共享同一个指针,这里会重复删除
    }

    void SetTracingInfo(CTracingInfo* p)
    {
        m_pTracingInfo = p;
    }
};

int main()
{
    std::cout << "=== 测试1: 正常的单次删除 ===" << std::endl;
    {
        CTransportContext ctx;
        ctx.SetTracingInfo(new CTracingInfo);
        // ctx 析构时删除 m_pTracingInfo,正常
    }
    std::cout << std::endl;

    std::cout << "=== 测试2: 重复删除(演示问题)===" << std::endl;
    {
        CTransportContext ctx1;
        ctx1.SetTracingInfo(new CTracingInfo);

        CTransportContext ctx2 = ctx1;  // 浅拷贝!ctx2.m_pTracingInfo == ctx1.m_pTracingInfo

        std::cout << "ctx1.m_pTracingInfo = " << static_cast<void*>(ctx1.m_pTracingInfo) << std::endl;
        std::cout << "ctx2.m_pTracingInfo = " << static_cast<void*>(ctx2.m_pTracingInfo) << std::endl;
        std::cout << "两个指针指向同一块内存!" << std::endl;
        std::cout << std::endl;

        // ctx1 析构:删除 m_pTracingInfo ✅
        // ctx2 析构:再次删除同一个指针 ❌ -> 重复删除!
    }
    // 程序在这里可能会崩溃

    std::cout << "=== 测试3: 直接重复删除指针 ===" << std::endl;
    {
        CTracingInfo* p = new CTracingInfo;
        delete p;  // 第一次删除 ✅
        std::cout << "第一次 delete 成功" << std::endl;

        delete p;  // 第二次删除 ❌ -> 重复删除!
        std::cout << "第二次 delete(这行可能不会执行,程序可能已崩溃)" << std::endl;
    }

    return 0;
}
输出:
$ ./test_double_delete
=== 测试1: 正常的单次删除 ===
CTracingInfo created at 0xc832c0
CTransportContext destructor called, deleting m_pTracingInfo = 0xc832c0
CTracingInfo destroyed at 0xc832c0

=== 测试2: 重复删除(演示问题)===
CTracingInfo created at 0xc832c0
ctx1.m_pTracingInfo = 0xc832c0
ctx2.m_pTracingInfo = 0xc832c0
两个指针指向同一块内存!

CTransportContext destructor called, deleting m_pTracingInfo = 0xc832c0
CTracingInfo destroyed at 0xc832c0
CTransportContext destructor called, deleting m_pTracingInfo = 0xc832c0
CTracingInfo destroyed at 0xc832c0
free(): double free detected in tcache 2
Aborted (core dumped)
问题路径:
用户代码 (main)
  → C++ 析构函数 (delete)
  → C 标准库 (free)
  → glibc 内部实现 (_int_free) ⭐ 在这里检测到 double free
  → 错误处理 (malloc_printerr)
  → 程序终止 (abort → raise → kill)
关键点:
_int_free()是 glibc 内存管理器的核心函数- 它通过维护 fastbin/tcache 和检查 chunk 状态来检测 double free
- 虽然程序崩溃了,但这比静默的堆损坏要好得多
- 这是 glibc 的安全机制,帮助我们及早发现问题
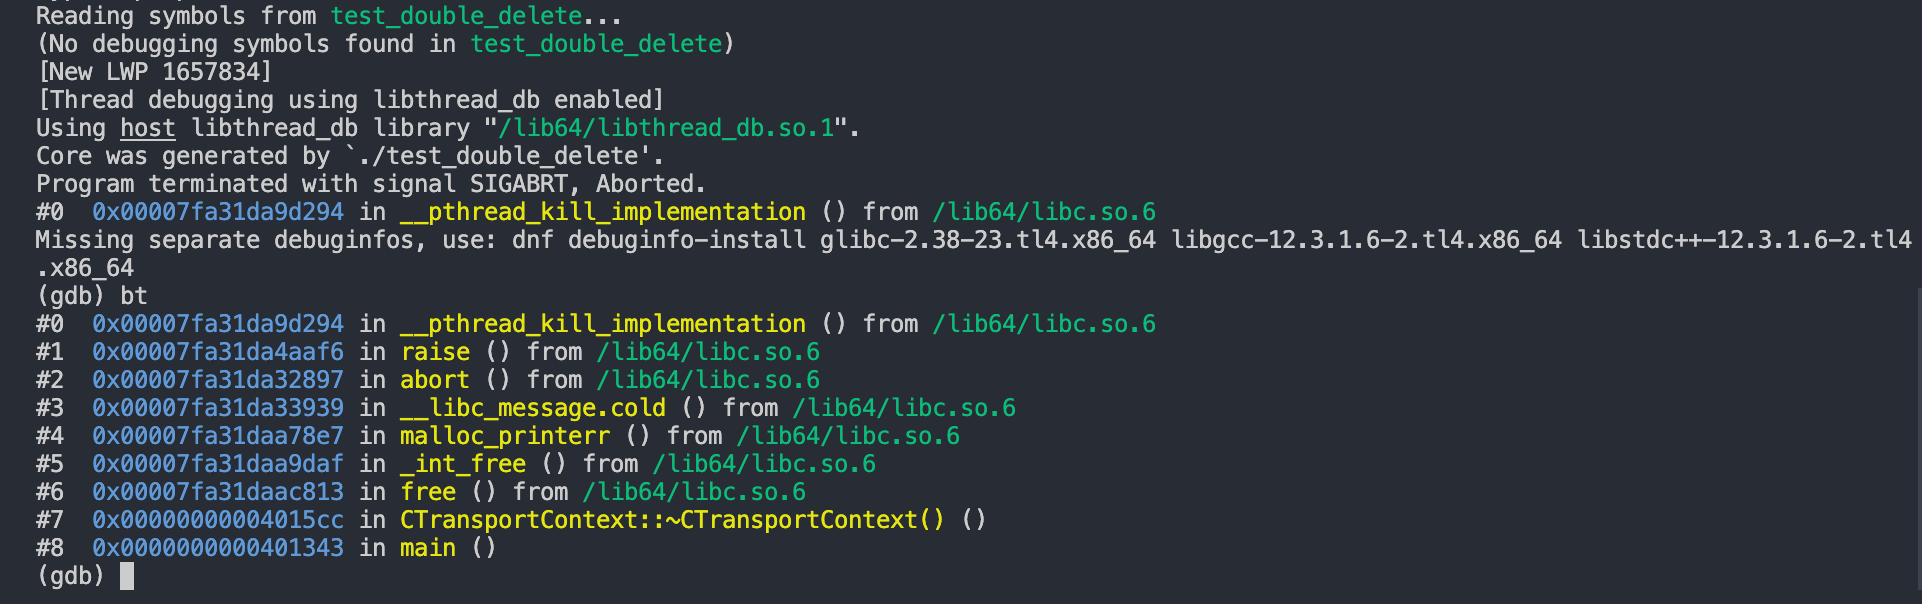
GDB 堆栈分析:问题路径(从下往上)
- #8: main() - 创建 ctx1 和 ctx2(浅拷贝,共享指针)
- #7: ~CTransportContext() - 析构函数调用 delete m_pTracingInfo
- 第一次(ctx1):正常删除
- 第二次(ctx2):重复删除,触发错误
- #6: free() - C 标准库释放函数入口
- #5: int_free() - 核心检测函数(见下方)
- #4: malloc_printerr() - 打印错误:”double free or corruption”
- #2-0: abort() → raise() → kill - 终止进程
_int_free() 检测机制
_int_free() 是 glibc 内存管理器的核心释放函数。
_int_free() 的作用:
- 内存释放的核心实现
- 将内存块归还给内存管理器
- 更新内存管理器的数据结构
- 安全检查机制
- 检测 double free
- 检测堆损坏(heap corruption)
- 检测无效指针
- 检测内存块边界错误
- 性能优化
- Fastbin: 快速分配小内存块
- Tcache: 线程本地缓存(glibc 2.26+)
- Coalescing: 合并相邻的空闲块
- 为什么能检测到 double free?
- 维护已释放内存块的记录(fastbin/tcache)
- 检查 chunk 的状态标记
- 检查内存管理数据结构的完整性
检测点 1: Fastbin/Tcache 检查
// 伪代码
if (size < FASTBIN_MAX_SIZE) {
    // 小内存块使用 fastbin
    fastbin_index = size_to_index(size);
    fastbin = &av->fastbins[fastbin_index];

    // ⚠️ 关键检测:检查是否已经在 fastbin 中
    if (p == fastbin->fd) {
        // 检测到:这个指针已经在 fastbin 的头部!
        malloc_printerr("double free or corruption (fasttop)");
    }

    // 将 chunk 插入 fastbin
    p->fd = fastbin->fd;
    fastbin->fd = p;
}
检测原理:
- Fastbin 是单链表结构
- 新释放的 chunk 会插入到链表头部
- 如果同一个指针再次释放,会在链表头部检测到重复
检测点 2: Chunk 状态检查
// 伪代码
chunk = mem2chunk(p);  // 将用户指针转换为 chunk 指针
size = chunksize(chunk);

// 检查 chunk 的边界
if (chunk_prev_size_mismatch(chunk)) {
    malloc_printerr("corrupted size vs. prev_size");
}

// 检查 chunk 是否已经被释放
if (chunk_is_marked_as_freed(chunk)) {
    malloc_printerr("double free or corruption");
}
检测点 3: Tcache 检查(glibc 2.26+)
// 伪代码(tcache 版本)
if (use_tcache && size <= tcache_max_bytes) {
    tcache_index = csize2tidx(size);
    tcache_bin = &tcache->bins[tcache_index];

    // ⚠️ 检查 tcache bin 是否已满或已包含此指针
    if (tcache_bin->count >= tcache_bin->max_count) {
        // tcache 已满,但尝试再次插入
        malloc_printerr("double free detected in tcache");
    }

    // 检查是否已经在 tcache 中(某些版本会检查)
    // ...
}
如何避免重复删除?
方法1:禁止拷贝
class CTransportContext {
public:
    // 禁止拷贝
    CTransportContext(const CTransportContext&) = delete;
    CTransportContext& operator=(const CTransportContext&) = delete;

    // 允许移动
    CTransportContext(CTransportContext&&) = default;
    CTransportContext& operator=(CTransportContext&&) = default;
};
方法2:使用智能指针
class CTransportContext {
private:
    std::unique_ptr<CTracingInfo> m_pTracingInfo;  // 自动管理内存
};
好处:符合 RAII 原则和现代 C++ 最佳实践
- 自动内存管理
- 无需手动 delete:unique_ptr 在析构时自动释放内存
- 防止内存泄漏:即使发生异常也能正确释放
- 防止重复删除:unique_ptr 不可拷贝,从根本上避免 double free
- 所有权明确
- 明确的所有权语义:unique_ptr 明确表示”独占所有权”
- 防止意外共享:unique_ptr 不可拷贝,只能移动
- 类型安全
- 编译期检查:尝试拷贝 unique_ptr 会在编译期报错
- 防止悬空指针:移动后原指针自动变为 nullptr
- 代码简化
- 无需手动 delete:析构函数更简洁
- 无需检查 nullptr:
delete nullptr是安全的,但 unique_ptr 更优雅
方法3:实现深拷贝
CTransportContext::CTransportContext(const CTransportContext& other)
    : m_pTracingInfo(other.m_pTracingInfo ? new CTracingInfo(*other.m_pTracingInfo) : nullptr)
{
    // 深拷贝其他成员...
}
方案4:使用引用计数(类似 shared_ptr)
// 使用 std::shared_ptr 管理 TracingInfo
std::shared_ptr<CTracingInfo> m_pTracingInfo;