Docker in Action
核心技术
Docker 运行容器依赖 Linux 内核的隔离与资源控制能力,并遵循 OCI(Open Container Initiative)相关规范。早期 Docker 曾支持基于 LXC 的实现,但如今主流实现已经以 OCI 运行时栈为中心:dockerd(Docker daemon)负责对外提供 API 与管理能力,底层通过 containerd 进行容器生命周期管理,实际创建/运行容器进程由 OCI runtime(常见为 runc)完成(见 Reference 的 OCI runtime: runc)。
runc is a CLI tool for spawning and running containers according to the OCI specification.
从操作系统与运行时机制看,Docker 的关键组成通常包括:
- Namespaces:进程、网络、挂载点、用户等隔离(容器“看起来像独立系统”)。
- cgroups(含 cgroup v2):CPU/内存/IO 等资源限制与统计(容器“用多少资源”)。
- Union filesystem / layered image:镜像分层与写时复制(常见存储驱动为
overlay2)。 - Linux 虚拟网络:bridge/host/overlay 等网络模型与端口映射。
- 安全机制:Linux capabilities、seccomp、AppArmor/SELinux 等(决定容器“能做什么/不能做什么”)。
一些思考
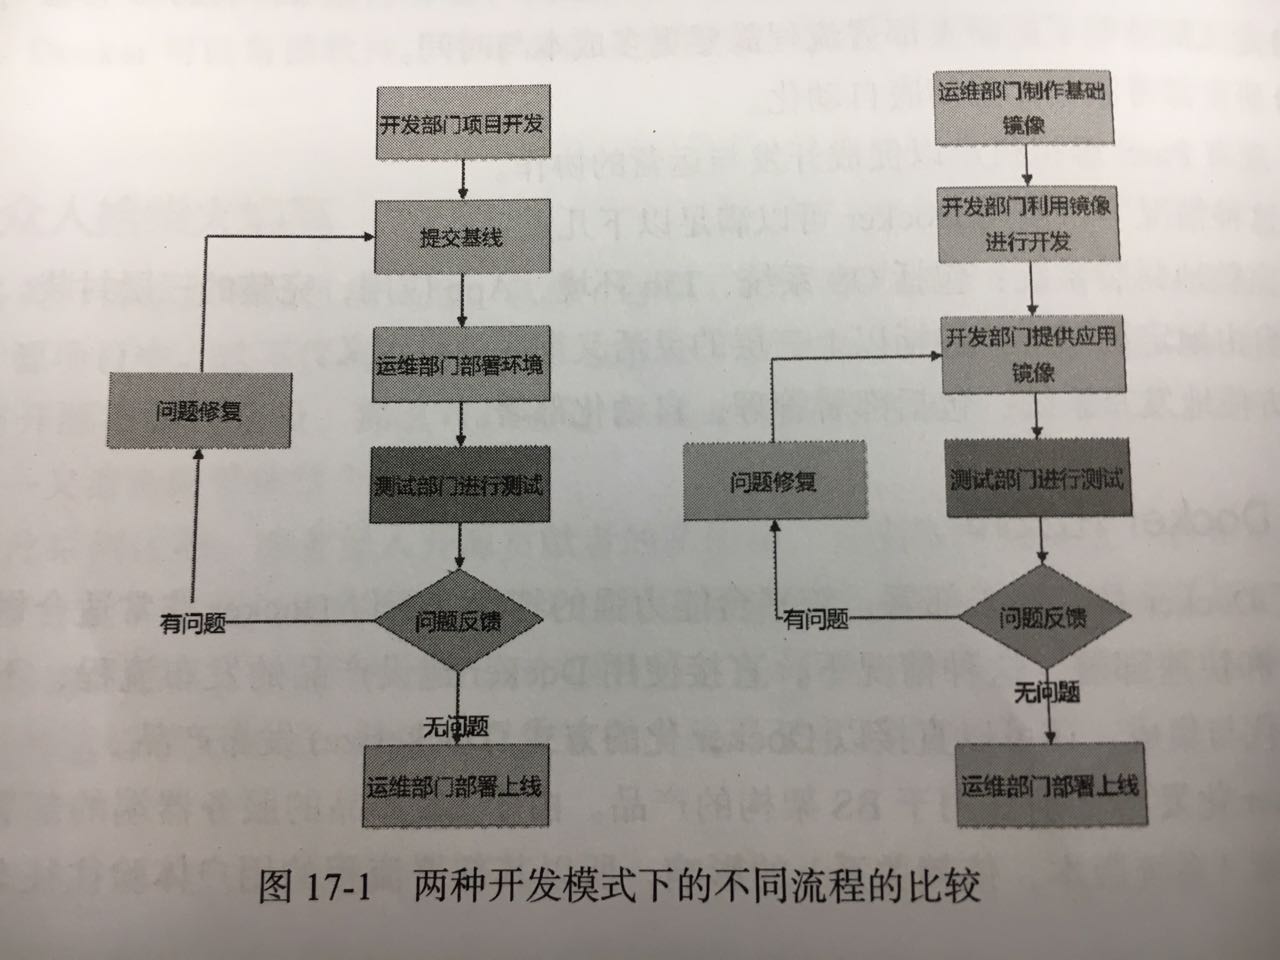
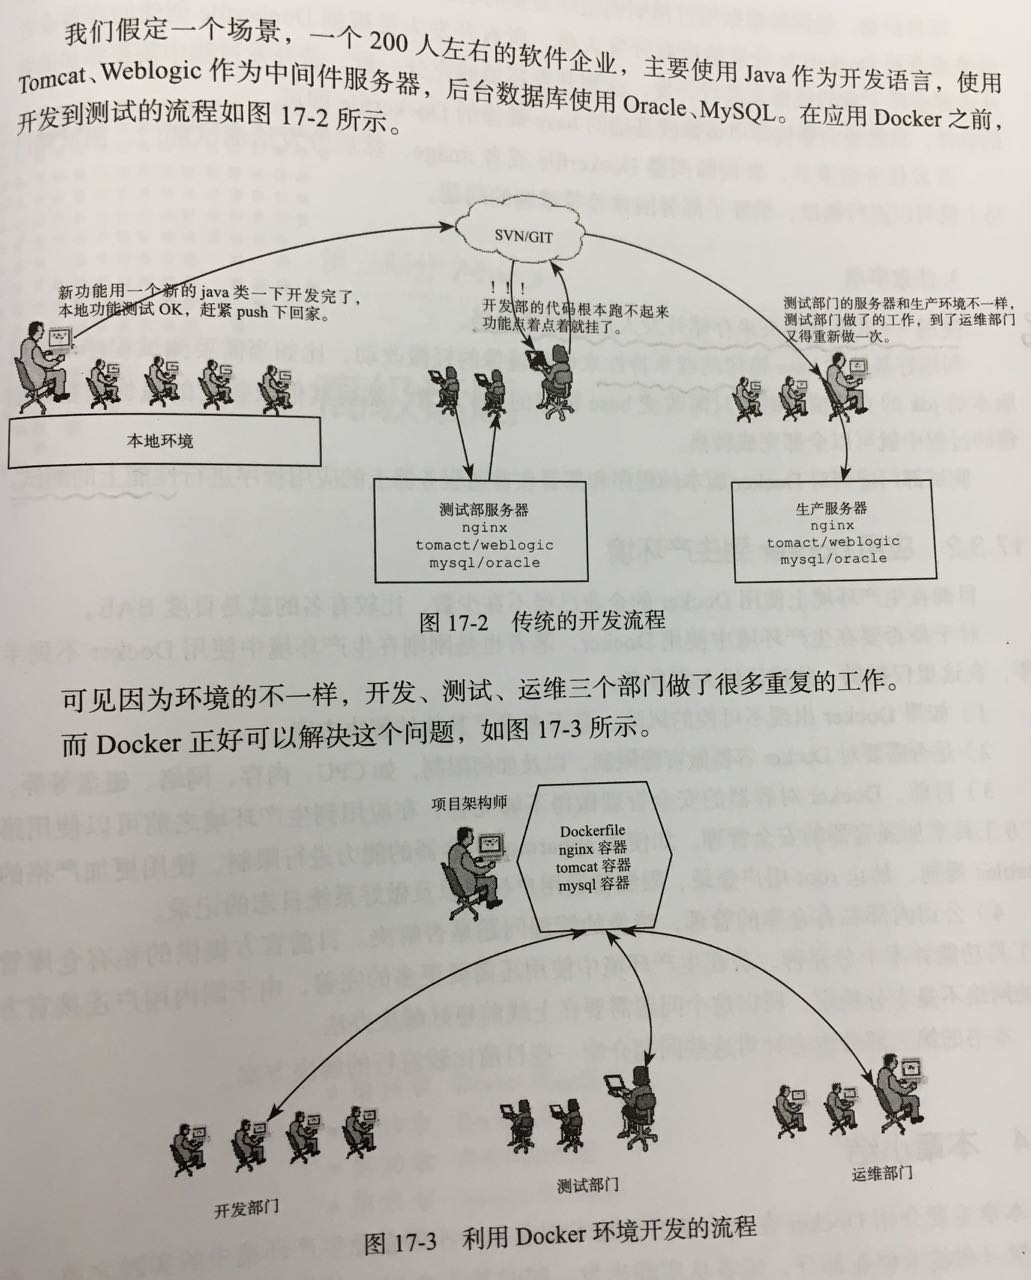
- 在 Docker 应用中,项目架构师的作用贯穿整个开发,测试,生产三个环节。
- 项目伊始,架构师根据项目预期创建好需要的基础 Base 镜像(比如,Nginx,Tomcat,MySQL 等镜像),或者将 Dockerfile 分发给所有开发,所有开发根据 Dockerfile 创建的镜像来进行开发,达到开发环境充分一致。
- 若开发过程中需要添加新的程序,需要向架构师申请修改基础的 Base 镜像的 Dockerfile。
- 开发完成后,将 Dockerfile 提交给测试,消除部署困难的问题。
- 使用
-v共享文件夹来存储开发的程序代码。 - 利用好 Base 镜像的继承特性来调整镜像的轻微改动。即,只需要修改 Base 镜像,而不需要修改其他依赖的镜像。
- 对 Docker 化程序和原生程序进行性能测试对比。
- 如果 Docker 出现不可控的风险,是否有替代方案。
- 是否需要对 Docker 容器做资源限制。
- 容器安全管理。
- 内部私有仓库的管理。
- 经验法则:优先让一个容器承载一个“主要进程/职责”(便于扩缩容、排障、资源隔离);但在某些场景下(如 sidecar、init、进程管理器)同一容器内存在多个进程也并非绝对错误。
- Vagrant 适合管理虚拟机,而 Docker 更适合管理应用运行环境。Docker 不是传统虚拟机,而是基于内核特性实现的进程隔离,因此资源开销通常更小。需要注意的是:容器运行依赖 Linux 内核;在 macOS/Windows 上通常通过 Docker Desktop(VM/WSL2)来提供 Linux 运行环境。
常用命令
这一节定位为“速查”,把最常用的命令按对象归类,便于记忆与检索。
命令风格(推荐优先记管理命令)
- 管理命令(推荐):
docker container .../docker image .../docker network .../docker volume ... - 传统顶层命令(仍可用):
docker ps/docker images/docker pull等(部分环境里会被标为 legacy)
例如:docker images ≈ docker image ls,docker ps ≈ docker container ls。
需要查参数时,优先看 Docker CLI 的参考手册(见 Reference 的 Docker CLI reference)。
最小工作流

# 1) 获取镜像
docker image pull <image>:<tag>
docker image ls

# 2) 运行容器(示例:后台运行 + 端口映射 + 命名)
docker run -d --name myapp -p 8080:8080 <image>:<tag>

# 3) 观察与排障
docker container ls
docker logs -f myapp

# 4) 进入容器(需要交互时)
docker exec -it myapp /bin/sh

# 5) 停止与清理
docker stop myapp
docker rm myapp

# 6) 快速回收空间(谨慎)
docker system prune
说明:示例统一使用“管理命令”风格(
docker image .../docker container ...)。你也可以按习惯换回docker images/docker ps。
Docker Compose(推荐)
当你需要同时运行多个服务(例如 Web + DB + Cache),或者希望把“运行参数”固化为可版本化的配置文件时,优先使用 Docker Compose。在较新的 Docker 版本里,Compose 通常以插件形式集成在 Docker CLI 中(使用 docker compose ...,见 Reference 的 Docker Compose)。
# 启动/停止(后台运行)
docker compose up -d
docker compose down

# 查看服务状态与日志
docker compose ps
docker compose logs -f
生命周期管理
docker run:创建并启动一个新容器。这是最常用的命令,结合了 create 和 start。docker run -d --name my_container nginx(-d后台运行,--name指定名称)。
-
docker start:启动一个或多个已经停止的容器。 docker stop <容器ID或名称>:优雅地停止运行中的容器(发送SIGTERM信号)。- 优雅停止并指定等待时间(例如 60 秒):
docker stop -t 60 <容器ID或名称>。如果不希望由于停止等待太久,可以配合-t 0参数快速停止。停止后的容器状态变为Exited,数据依然保留,可用docker start重新启动。 - 停止所有正在运行的容器:
docker stop $(docker ps -q)
- 优雅停止并指定等待时间(例如 60 秒):
docker restart:重启容器。docker pause / unpause:暂停或恢复容器中所有的进程。docker kill <容器ID或名称>:强制停止容器(发送SIGKILL信号)。docker rm:删除已停止的容器。使用-f可强制删除运行中的容器。
提示:在执行这些命令时,通常可以使用容器的名称或 ID(只需输入前几位能唯一标识即可)。
状态查看与监控
docker ps:列出当前正在运行的容器。docker ps -a:查看所有容器,包括已停止的。
docker logs:查看容器日志。docker logs -f <ID>:持续跟踪日志输出。
docker stats:实时显示容器的资源使用情况(CPU、内存、网络 I/O)。docker inspect:获取容器的详细元数据(JSON 格式),如 IP 地址、配置信息等。docker top:查看容器内运行的进程。
容器交互操作
docker exec:在运行中的容器内执行命令。docker exec -it <ID> /bin/bash:进入容器的交互式终端。
docker cp:在容器与宿主机之间拷贝文件。docker port:查看容器的端口映射情况。
资源清理
-
docker container prune:一键清理所有已停止的容器,释放系统资源。 - 容器清理(按需删除)
docker ps -a:先查看有哪些“退出/停止”的容器。docker rm <容器ID或名称> [...]:删除一个或多个已停止的容器。docker rm -f <容器ID或名称>:强制删除容器(会先停止正在运行的容器再删除,谨慎使用)。
- 镜像清理(按需删除)
docker images:查看本地镜像列表。docker rmi <镜像ID|镜像名:tag> [...]:删除一个或多个镜像。- 如果镜像正在被容器使用(即使容器已停止),需要先删除相关容器,或改用
docker rmi -f(仍需谨慎)。
- 如果镜像正在被容器使用(即使容器已停止),需要先删除相关容器,或改用
docker image prune:清理“悬空镜像”(dangling images,通常是构建过程中遗留的无 tag 中间镜像)。docker image prune -a:清理所有未被任何容器使用的镜像(比默认更激进,建议先确认)。
- 一键清理(更彻底,需谨慎)
docker system prune:清理无用数据(已停止容器、未使用网络、构建缓存等;默认会清理 dangling images,但不会删除“所有未被任何容器使用的镜像”)。docker system prune -a:在上面基础上额外删除未使用镜像。docker system prune -a --volumes:再额外删除未使用的 volumes(可能会导致数据库/持久化数据丢失,务必确认)。
docker system prune -a --volumes很容易造成不可逆的数据丢失(尤其是你把数据库数据放在 named volume 的情况下)。在生产机器上建议先用docker system df做“定位”,再逐项清理。
# 常见组合:先看、再删
docker ps -a
docker container prune

docker images
docker image prune
docker image prune -a

# 想“一键”但保持可控时,先不加 -a/--volumes
docker system prune
镜像构建
参考:见 Reference 的 docker image build 与 Building best practices。
docker build -t vieux/apache:2.0 .
在较新的 Docker 版本与多数环境中,镜像构建通常由 BuildKit 后端驱动(更快、缓存更强、支持并发与更丰富的输出)。当你需要更高级的构建能力(例如:多架构镜像、远端缓存、并行 builder),通常会使用 docker buildx。
# 使用 BuildKit 的纯文本输出(便于在 CI 里排查)
BUILDKIT_PROGRESS=plain docker build -t myapp:dev .

# 创建并使用 buildx builder(不同环境默认可能已存在)
docker buildx create --use --name mybuilder
docker buildx inspect --bootstrap

# 构建多架构镜像并推送(示例:linux/amd64 + linux/arm64)
docker buildx build \
  --platform linux/amd64,linux/arm64 \
  -t myrepo/myapp:1.0.0 \
  --push \
  .
容器指标
cAdvisor(Container Advisor)是一个常用的容器监控组件,可采集并暴露容器的 CPU、内存、网络、文件系统等指标(见 Reference 的 cAdvisor)。
测试使用 (CentOS)
$docker version
Client:
 Version:           18.09.7
 API version:       1.39
 Go version:        go1.10.8
 Git commit:        2d0083d
 Built:             Thu Jun 27 17:56:06 2019
 OS/Arch:           linux/amd64
 Experimental:      false

Server: Docker Engine - Community
 Engine:
  Version:          18.09.7
  API version:      1.39 (minimum version 1.12)
  Go version:       go1.10.8
  Git commit:       2d0083d
  Built:            Thu Jun 27 17:26:28 2019
  OS/Arch:          linux/amd64
  Experimental:     false
$docker info
Containers: 0
 Running: 0
 Paused: 0
 Stopped: 0
Images: 9
Server Version: 18.09.7
Storage Driver: overlay2
 Backing Filesystem: extfs
 Supports d_type: true
 Native Overlay Diff: false
Logging Driver: json-file
Cgroup Driver: cgroupfs
Plugins:
 Volume: local
 Network: bridge host macvlan null overlay
 Log: awslogs fluentd gcplogs gelf journald json-file local logentries splunk syslog
Swarm: inactive
Runtimes: runc
Default Runtime: runc
Init Binary: docker-init
containerd version: 894b81a4b802e4eb2a91d1ce216b8817763c29fb
runc version: 425e105d5a03fabd737a126ad93d62a9eeede87f
init version: fec3683
Security Options:
 seccomp
  Profile: default
Kernel Version: 3.10.107-1-tlinux2_kvm_guest-0049
Operating System: Tencent tlinux 2.2 (Final)
OSType: linux
Architecture: x86_64
CPUs: 16
Total Memory: 31.17GiB
Name: VM-11-48-centos
ID: OLLW:ZRBS:Z2XV:34ER:NKGJ:NNH4:LKOX:YX3U:BSDO:SL2I:F7S7:CMSM
Docker Root Dir: /data/docker
Debug Mode (client): false
Debug Mode (server): false
Registry: https://index.docker.io/v1/
Labels:
Experimental: false
Insecure Registries:
 bk.artifactory.oa.com:8080
 csighub.tencentyun.com
 docker.oa.com:8080
 hub.oa.com
 127.0.0.0/8
Registry Mirrors:
 http://docker.oa.com:8080/
 http://csighub.tencentyun.com/
Live Restore Enabled: false
Product License: Community Engine
用户管理
sudo service docker start         # 启动 docker 服务
sudo usermod -aG docker ${USER}   # 当前用户加入 docker 组
说明:
service docker start 是启动 Docker 的后台服务
usermod -aG 是把当前的用户加入 Docker 的用户组。这样可以在不加
sudo的情况下运行docker命令。重要安全提示:Docker 官方文档明确指出,加入
docker组会授予用户 root-level privileges(本质上等价于 root 权限)。在多用户机器或生产环境中,应谨慎评估这带来的风险;如果希望在不授予 root 等价权限的前提下使用 Docker,可以考虑 Rootless mode。参考:见 Reference 的 Linux post-installation steps 与 Rootless mode。
Dockerfile
参考:见 Reference 的 Dockerfile reference。
CMD
The CMD instruction has three forms:
CMD ["executable","param1","param2"] (exec form, this is the preferred form)
CMD ["param1","param2"] (as default parameters to ENTRYPOINT)
CMD command param1 param2 (shell form)
There can only be one CMD instruction in a Dockerfile. If you list more than one CMD then only the last CMD will take effect.
The main purpose of a CMD is to provide defaults for an executing container. These defaults can include an executable, or they can omit the executable, in which case you must specify an ENTRYPOINT instruction as well.
If CMD is used to provide default arguments for the ENTRYPOINT instruction, both the CMD and ENTRYPOINT instructions should be specified with the JSON array format.
The exec form is parsed as a JSON array, which means that you must use double-quotes (“) around words not single-quotes (‘).
If you use the shell form of the CMD, then the <command> will execute in /bin/sh -c:
FROM ubuntu
CMD echo "This is a test." | wc -
If you want to run your <command> without a shell then you must express the command as a JSON array and give the full path to the executable. This array form is the preferred format of CMD. Any additional parameters must be individually expressed as strings in the array:
FROM ubuntu
CMD ["/usr/bin/wc","--help"]
If you would like your container to run the same executable every time, then you should consider using ENTRYPOINT in combination with CMD. See ENTRYPOINT(见 Dockerfile 以及 Reference 的 Dockerfile reference)。
If the user specifies arguments to
docker runthen they will override the default specified inCMD.
ENTRYPOINT
An ENTRYPOINT allows you to configure a container that will run as an executable.
ENTRYPOINT has two possible forms:
- The exec form, which is the preferred form:
ENTRYPOINT ["executable", "param1", "param2"]
- The shell form:
ENTRYPOINT command param1 param2
For more information about the different forms, see Shell and exec form(见 Reference 的 Dockerfile reference)。
EXPOSE
The EXPOSE instruction informs Docker that the container listens on the specified network ports at runtime. You can specify whether the port listens on TCP or UDP, and the default is TCP if you don’t specify a protocol.
The EXPOSE instruction doesn’t actually publish the port. It functions as a type of documentation between the person who builds the image and the person who runs the container, about which ports are intended to be published. To publish the port when running the container, use the -p flag on docker run to publish and map one or more ports, or the -P flag to publish all exposed ports and map them to high-order ports.
EXPOSE 用来声明容器在运行时会监听哪些端口,它本身不会:
- 在宿主机上开放端口
- 做端口映射
- 改变容器网络行为
它的作用是:
- 文档说明:告诉维护者这个镜像会监听哪些端口
- 配合
docker run -P:使用-P时,Docker 会把EXPOSE声明的端口随机映射到宿主机 - 配合编排工具:Kubernetes、Docker Compose 等可以据此知道要暴露哪些端口
例如:
# 使用 -P 时,EXPOSE 的 8080、9090、9091 会被映射到宿主机随机端口
docker run -P namesvr

# 使用 -p 时,需要自己指定映射,与 EXPOSE 无关
docker run -p 8080:8080 -p 9090:9090 -p 9091:9091 namesvr
HEALTHCHECK
The HEALTHCHECK instruction has two forms:
HEALTHCHECK [OPTIONS] CMD command(check container health by running a command inside the container)HEALTHCHECK NONE(disable any healthcheck inherited from the base image)
The HEALTHCHECK instruction tells Docker how to test a container to check that it’s still working. This can detect cases such as a web server stuck in an infinite loop and unable to handle new connections, even though the server process is still running.
When a container has a healthcheck specified, it has a health status in addition to its normal status. This status is initially starting. Whenever a health check passes, it becomes healthy (whatever state it was previously in). After a certain number of consecutive failures, it becomes unhealthy.
For example, to check every five minutes or so that a web-server is able to serve the site’s main page within three seconds:
HEALTHCHECK --interval=5m --timeout=3s \
  CMD curl -f http://localhost/ || exit 1
Q&A
How can I find a Docker image with a specific tag in Docker registry on the Docker command line?
I try to locate one specific tag for a Docker image. How can I do it on the command line? I want to avoid downloading all the images and then removing the unneeded ones.
Answers:
#!/usr/bin/env bash
# 说明:Docker CLI 本身不提供“列出某镜像所有 tags”的统一命令;这是对 Docker Hub HTTP API 的一次简单调用。
# 注意:结果可能分页;且 Docker Hub 可能存在访问频率限制。
image="${1:?usage: $0 <image>}"
curl -fsSL "https://registry.hub.docker.com/v2/repositories/library/${image}/tags/?page_size=100" \
  | jq -r '.results[].name' \
  | sort
权限问题:dial unix /var/run/docker.sock: connect: permission denied
问题描述:在当前用户权限下使用 docker 命令需要 sudo 否则出现以下问题:
[user00@~]$ docker ps -l
Got permission denied while trying to connect to the Docker daemon socket at unix:///var/run/docker.sock: Get http://%2Fvar%2Frun%2Fdocker.sock/v1.39/containers/json?limit=1: dial unix /var/run/docker.sock: connect: permission denied
解决方案:将当前用户加入 docker 组后,可在不加 sudo 的情况下运行 Docker CLI,命令如下:
groupadd docker            # 添加 docker 用户组
gpasswd -a 用户名 docker    # 将登陆用户加入到 docker 用户组中
newgrp docker              # 更新用户组
systemctl restart docker   # 最后重启 docker 生效
安全提示(官方 WARNING):
docker组会授予用户 root-level privileges。在多用户环境/生产环境中,建议优先使用sudo docker ...或评估使用 Rootless mode。
镜像过大导致根目录磁盘空间用完
问题描述:由于系统初始分区的原因,操作系统中对应 / 分区不会太大,通常 /var 目录不会单独分区。如果上面运行 Docker 服务,经过长时间的使用,镜像下载过多会导致根目录磁盘空间用完。
[user00@~]$ df -h
Filesystem    Size  Used Avail Use% Mounted on
/dev/vda1      99G   98G     0 100% /
注意:1. 首先排除 root 用户的根目录下是否有不需要的数据,并进行清理。2. yum clean all 清理当前的 yum 缓存数据。
解决方法:优先做到“先定位、再清理/迁移”。
1) 定位占用来源
docker system df:查看镜像、容器、卷、构建缓存的磁盘占用概览。docker info:确认Docker Root Dir(默认常见为/var/lib/docker)。
2) 清理无用数据(谨慎)
/var/lib/docker 目录中保存着容器数据、卷、构建缓存、网络等信息。镜像通常占用最大;此外,构建缓存与容器日志也常常悄悄膨胀。
# 清理停止容器/未使用网络/构建缓存等(默认不会删除所有未使用镜像)
docker system prune

# 更彻底:额外清理未使用镜像(危险,建议先确认)
docker system prune -a

# 清理未被任何容器引用的本地卷(可能导致数据丢失,务必确认)
docker volume prune
日志增长治理:在 Linux 上,默认日志驱动常见为
json-file,长时间运行的容器日志可能导致磁盘被打满。可以考虑配置日志轮转,或使用默认带轮转的local日志驱动(见 Reference 的 Linux post-installation steps)。

第一步:对于不需要的文件,可先清理 Docker 使用的空间(可选)
清理不再使用的容器。可以使用以下命令清理容器、网络文件、镜像和构建缓存:
$docker system prune -a
WARNING! This will remove:
        - all stopped containers
        - all networks not used by at least one container
        - all images without at least one container associated to them
        - all build cache
Are you sure you want to continue? [y/N] y
清除不再使用的卷:
$docker volume prune
WARNING! This will remove all local volumes not used by at least one container.
Are you sure you want to continue? [y/N] y
3) 迁移 Docker 数据目录(推荐使用 data-root 配置)
如果根分区容量不足,最直接有效的方式通常是把 Docker 数据目录迁移到更大的磁盘分区。相比“软链接”,更推荐通过 daemon 配置显式设置 data-root(更可维护、行为更确定)。
# 停止 Docker 服务
service docker stop
# 如果停止不了,可尝试 systemctl stop docker.socket docker.service

# 迁移旧数据到新目录(示例:/data/docker)
mkdir -p /data/docker
rsync -aHAXx /var/lib/docker/ /data/docker/

# 配置 data-root(常见位置:/etc/docker/daemon.json)
# 写入后再启动 docker(示例内容见下方)

# 启动 Docker 服务
service docker start
/etc/docker/daemon.json 示例:
{
  "data-root": "/data/docker"
}
延伸阅读
见文末 Reference 的「其它参考(历史链接)」。
Reference
本文正文不直接贴外链,统一在此集中维护;正文通过锚点交叉引用到这里,方便长期更新。
Docker 官方文档
- https://docs.docker.com/
- https://docs.docker.com/get-started/
- https://docs.docker.com/guides/
- https://docs.docker.com/manuals/
- https://docs.docker.com/reference/
Docker CLI / Compose
Docker CLI reference
https://docs.docker.com/reference/cli/docker/
docker image build
https://docs.docker.com/reference/cli/docker/image/build/
Docker Compose
https://docs.docker.com/compose/
Dockerfile
Dockerfile reference
https://docs.docker.com/reference/dockerfile/
安全与安装
Linux post-installation steps(含 docker group WARNING 与日志驱动建议)
https://docs.docker.com/engine/install/linux-postinstall/
Rootless mode
https://docs.docker.com/engine/security/rootless/
构建最佳实践
Building best practices
https://docs.docker.com/build/building/best-practices/
生态/工具
OCI runtime:runc
https://github.com/opencontainers/runc
cAdvisor
https://github.com/google/cadvisor
其它参考(历史链接)
- Docker 使用桥接的通信方案:
https://blog.csdn.net/delphiwcdj/article/details/49508045 - 使用 Docker registry 镜像创建私有仓库:
https://blog.csdn.net/delphiwcdj/article/details/43099877 - Where are Docker images stored?:
https://blog.csdn.net/delphiwcdj/article/details/43602877 - 本人脚本:
https://github.com/gerryyang/mac-utils/tree/master/tools/docker - 《Docker - 从入门到实践》:
https://yeasy.gitbook.io/docker_practice/ - 三个技巧,将 Docker 镜像体积减小 90%:
https://www.infoq.cn/article/3-simple-tricks-for-smaller-docker-images